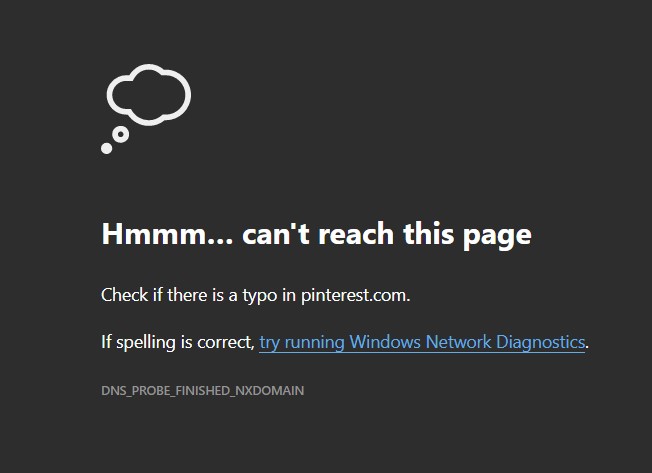
DNS_Probe_Finished_Nxdomain: Fix in Chrome, Windows, Mac, Android
Errors are common in the world of the internet. We sometimes face difficulty in connecting to some websites and the search engine shows up weird messages. If you work frequently with websites like WordPress, white screen of death or database connection errors are but obvious. But when there is a problem with your internet connectivity or DNS, the error coming up can be “This site can’t be reached – server IP address could not be found” along with DNS_PROBE_FINISHED_NXDOMAIN.
In this article, we will learn about what this error means and several methods to fix it. In various operating systems and devices, the steps we must follow are different. All the details are explained here. Choose the right method for your device and enjoy uninterrupted workflow.
What is DNS_PROBE_FINISHED_NXDOMAIN?
As we have seen earlier, this error occurs through any issue with the DNS. DNS stands for Domain Name System. The purpose of DNS is to manage the process of interpreting a domain name into an IP address. It is due to this facility that you are able to visit sites with friendly names rather than confusing IP addresses.
When you enter a link to a web browser, the DNS works to convert that into the computer-friendly language of the IP address of the real server. The DNS_PROBE_FINISHED_NXDOMAIN error occurs when the DNS is unable or gets interrupted in resolving the domain name or address.
NXDOMAIN means Non-Existent Domain. This error occurs as various messages are in different web browsers.
Don’t Miss:
- wpa-psk [tkip] + wpa2-psk [aes]
- Wireless Network Security Type
- Err_connection_refused
- LG ims keeps stopping
Why DNS_PROBE_FINISHED_NXDOMAIN error occurred?
When DNS name resolution is not completed properly, this error will occur. This doesn’t mean that this domain doesn’t exist. It just means that some sort of error is preventing DNS from translating or identifying the domain.
This error can be a concern with your browser or device settings. Sometimes, typing the wrong URL can also cause this problem. Also, conflict with third-party software like anti-virus or a Virtual Private Network (VPN) can prevent the DNS from doing its job. The most common reason for this error is produced by outmoded or incorrectly configured DNS settings.
How to fix DNS_PROBE_FINISHED_NXDOMAIN on PC
There are numerous ways to fix this error in each search engine and OS. Ways to Fix DNS_PROBE_FINISHED_NXDOMAIN in Chrome, Windows, and Mac. Let us take a look at every one of them.
Check the entered URL
Double-check the URL that you entered. Check for any typos and make sure that the URL is correct. An incorrectly entered URL can cause a DNS error.
Reset Chrome Flags
New features or extensions installed in your browser can cause errors in Chrome settings, which in turn can affect the DNS settings. Hence, there is a chance that the error message is due to any incompatible extension.
So, resetting the Chrome flags to the default settings is another way to resolve the error. To do that, type the command chrome://flags in your browser and enter. Choose the Reset all button on the screen. You can try accessing the website again after restarting your browser.
Disable antivirus or VPN
As we discussed earlier, one of the reasons for the DNS error can be a VPN or antivirus software that tampers with network and DNS server settings. Temporarily disabling them or uninstalling them might resolve the problem of DNS error messages.
Flush Chrome Browser Cache
Cleaning out your Chrome browser cache is another effective way to resolve the DNS_PROBE_FINISHED_NXDOMAIN issue. To do this, open a new tab in your Chrome browser and click on the three dots at the top right corner. Then pick More Tools and Clear browsing data.
Another window opens then. From there, make sure to choose Cookies and other site data and Cached images and files. After that, choose the Clear data option. Then restart your browser and revisit your website.
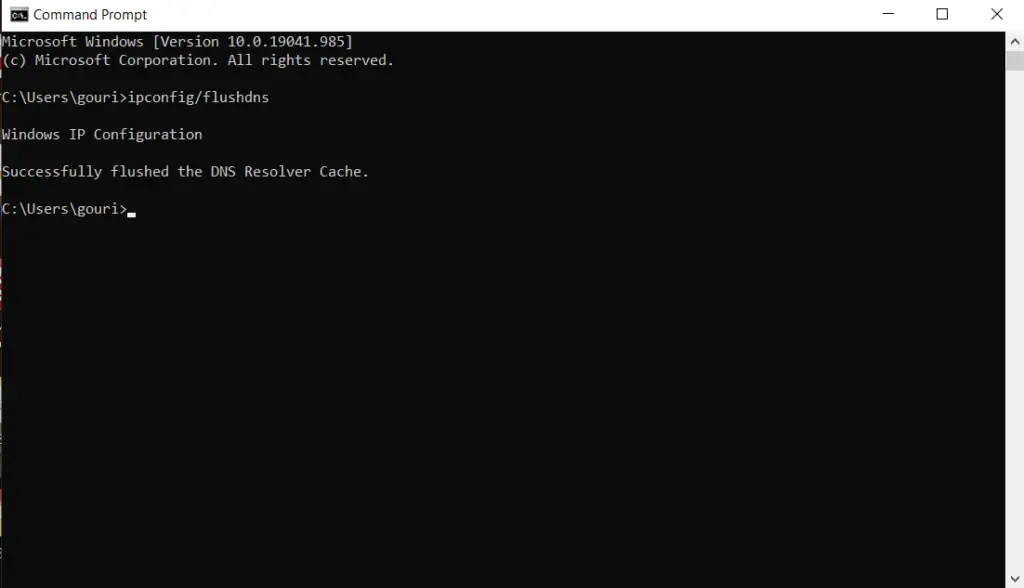
Flush local DNS cache
You can try flushing your local DNS cache if flushing your Chrome browser cache didn’t work. This is done to clear out all the IP addresses of the sites you have already visited.
The steps to do so in Windows and Mac devices are different and are explained here.
Windows
- Search for cmd in the Windows search bar.
- Find the command prompt.
- Open it to run as administrator.
- Enter the command ipconfig/flushdns.
- Click Enter. When it is completed, a message Successfully flushed the DNS Resolver Cache will be visible.
- Try visiting the website again after restarting the browser.
Mac
- Find the Utilities folder from the Applications.
- Click on Terminal and open it.
- Enter the command dscacheutil -flushcache.
- Press return.
- No success message will be shown as in Windows. You can try visiting the website again after restarting the browser.
Release and Renew IP address
The next method you can try if flushing the DNS cache doesn’t resolve the problem is to release and renew the IP address. It involves running commands and the detailed steps on how to do it are explained here.
Windows
- Enter cmd in the search bar of Windows.
- Find command prompt.
- Open it with run as administrator.
- Enter the command ipconfig/release.
- Press enter to release your prevailing IP address.
- Now type in ipconfig /flushdns and click Enter.
- The success message will appear.
- After that, type ipconfig /renew and press Enter to renew your IP address.
- Type in these two commands netsh int ip set dns and netsh winsock reset to reset the Winstock on your Windows device.
Mac
- Find the Utilities folder from the Applications.
- Click on Terminal and open it.
- Enter the command sudo killall –HUP mDNSResponder.
- Press return.
Change the DNS servers
Usually, your Internet Service Provider (ISP) specifies your DNS server. But, you can temporarily change to another DNS server to resolve the error issue. The steps for doing this differ in Windows and Mac.
Windows
- Click the Windows logo and R keys for a few seconds.
- The Run panel opens up.
- Type Control Panel there and press OK. Or, You can also open Control pannel directly from the start button.
- Open Network & internet, nect click on the Network and Sharing Center.

- From the left, Choose Change adapter settings.
- Right-click on your currently used connection.
- Select Ethernet Properties.
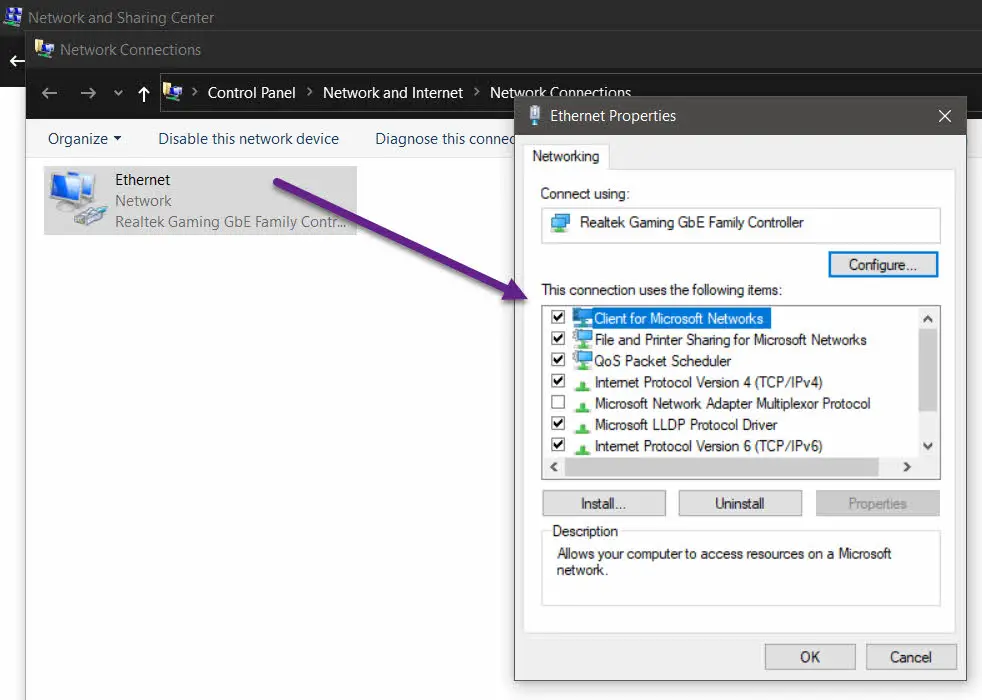
- From the next window, find the Internet Protocol Version 4 (TCP/IPv4).
- Again Choose the Properties button.
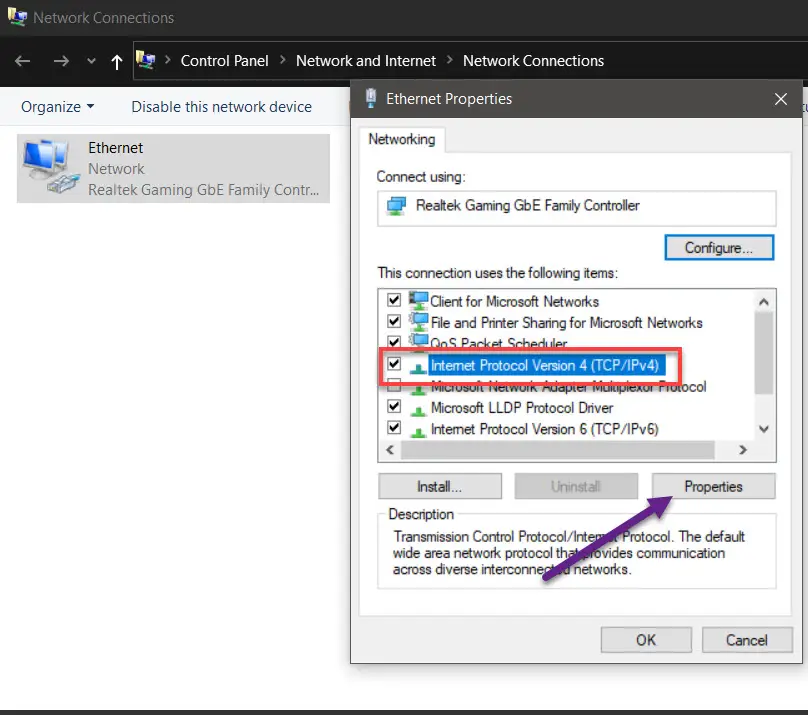
- Choose to Use the following DNS server addresses from the General Tab.
- For each field, enter the following values:
- Preferred DNS server: 8.8.8.8
- Alternative DNS Server: 8.8.4.4
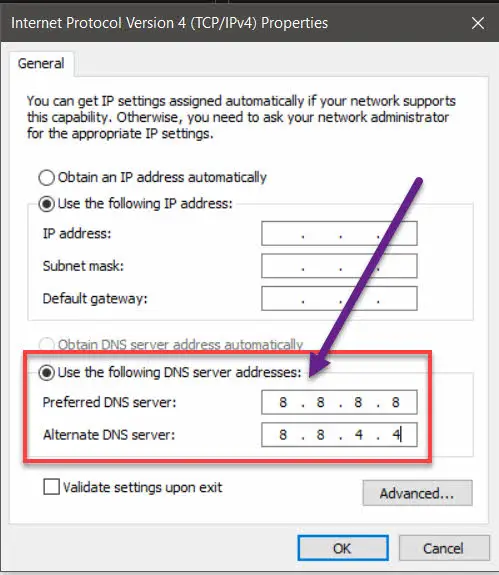
- Select OK.
Mac
- Go to System Preferences and then Network.
- Find the network connection you are presently using.
- Click on Advanced.
- Select the (+) icon near IPv4 or IPv6 addresses from the DNS tab.
- Then enter 8.8.8.8 and 8.8.4.4.
- Click OK and then Close.
Restart the DNS Client Service
Restarting the DNS client services will help you fix the DNS_PROBE_FINISHED_NXDOMAIN error in Windows. To do that, follow the given steps.
- Press and hold the Windows logo and R keys.
- The Run panel opens up.
- Type services.msc there and press OK.
- Find the DNS client in the Name column.
- Choose Restart after right-clicking.
Check the local ‘Hosts’ file
Making sure that the domain you are trying to access is not listed under the local ‘hosts’ file of your device is a way to find the source of the error. This file is usually used for reviewing a DNS before changing to a different host. But this can also be the reason for your error messages of any changes that have occurred. The steps to do this are provided below:
Windows
- Open your preferred text editor (like Notepad).
- Run it as administrator.
- Choose File and then Open.
- Then find C:\Windows\System32\drivers\etc\.
- Open the ‘hosts’ file.
- Ensure that the domain you are attempting to access is not in that file. If yes, then delete it and open it again.
Mac
- Find the Utilities folder from the Applications.
- Click on Terminal and open it.
- Enter the command sudo nano /private/etc/hosts.
- Click Return.
- Check for the domain you are trying to access in that File.
Restart your device
The most effective and simple way to get past the DNS_PROBE_FINISHED_NXDOMAIN issue is to restart your computer. It can be kept as a last option after trying out all these above chances.
Fix DNS_PROBE_FINISHED_NXDOMAIN on Android
Android Chrome app can also show the DNS_PROBE_FINISHED_NXDOMAIN error. We can see some ways to fix that issue in Android too.
Check for Android system and Chrome app updates
If the software in your phone is outdated, a DNS error may occur. For checking the updates, follow the given steps:
- Go to Settings.
- Then go to System.
- Click on System Update.
- If any update is available, do it.
You can also check for any available Chrome app updates.
- Go to the play store and search for the Chrome app.
- Update the app if it is available.
Clear your Chrome Browser and App data
Clearing your data is another solution for the DNS error. For that, open the Chrome app and tap on the three dots at the top right corner. Then click on Settings, then Privacy and Clear browsing data. You can also remove the Chrome app data. For that, go to Settings, then Storage, Apps, and then Google Chrome. Select the Free up space button and clear the unnecessary site data.
Change your Android Network Settings
The DNS settings in your device can be manually changed. For this, go to the Settings app and choose Network and Internet. Press and hold the Wi-Fi connection and choose Modify Network. Go to Advanced options and choose Static from the menu. You can find fields to enter DNS server addresses at the bottom. Enter DNS value 8.8.8.8 under DNS 1 and 8.8.4.4 under DNS 2. Then, save your changes.
Conclusion
For regular WordPress users, the DNS_PROBE_FINISHED_NXDOMAIN is a common issue. It is irritating to find this every time you try to do some work. Resolving this error is one of the easiest troubleshooting methods in the internet world.
Make sure to read the instructions one by one and work accordingly. If any of the options work, don’t try to do the next one. Always try to go for the easiest solution available. These error messages are quite common and can be resolved if you have the required knowledge.
You can minimize the occurrence of this error by purchasing premium maintenance services. It will help your workflow without any interruptions.


An impressive share! I have just forwarded this to a develper who has been conducting a little homework on DNS_Probe_Finished_Nxdomain. And he actually ordered me simply because I stumbled upon it for him… lol. So allow me to reword this…. Thanks for the this article!!
But yeah, thanx for spending some time to talk about this issue here on your web page.
Oh my goodness! Incredible article dude! Many thanks,
However I am experiencing troubles with DNS_Probe_Finished_Nxdomain. I don’t understand the reason why I can’t fix it?
Your solution is perfect Thanx!!
I like the helpful information you provide in your articles.
I’ll bookmark your weblog and check again here frequently. I am quite certain I’ll learn plenty of new stuff right here!
Best of luck for the next!