Scan and Repair Drive
On booting up your device/windows startup a report pops up that states ‘Scan and repair drive’. What is this? Why the issue occurred? How scan and repair drive? Here we are dealing with the 4 best methods to fix the issue in just a few minutes. Before that just learn some basics on basicknowledgehub.
Booting up your PC or Laptop and seeing any error already popped up in your face is a mood buster and a bigger concern to that is seeing the ‘Scan and repair drive’ error message on your screens. This error causes danger and poses a threat to your data. If you are also a victim of the ‘Scan and repair drive error’ message then this tutorial is for you. You will be surprised to know that this is a quite common concern among Windows users. A still better alternative to this tutorial is to know how to prevent this from happening. Knowing how to stop popping of these error messages is always better than looking for a tutorial on the web.
If still, you have landed into the problem then no need to worry or panic as we have the solution ready for you. This article will guide you to the very core of the problem and help you solve your problem. Even if you have not landed into the problem we suggest that you read the whole article for getting a grasp of the error causes and solutions which may prove helpful and useful in your future businesses. So don’t worry and let’s jump right into the problem and get this error out of our systems together.
Windows
In history, the most influential company in the tech field has to be Microsoft. The Microsoft Windows too has to be the most game-changing operating system in the history of operating systems. There might hardly be a person on this planet Earth who has not heard of Microsoft or Windows or Bill Gates, the man behind Microsoft. Based on the open-source format back in 1985, Windows 1.0 was ahead of its time and was considered a miracle in the tech industry. The initial release of the Windows 1.0 had a feature set called MS-DOS Executive. This mainly consisted of Calculator, Calendar, Cardfile, Clipboard viewer, Clock, Control Panel, Notepad, Paint, Reversi, Terminal, and Write. All these were great innovations at the time but gained little attention as they had to compete with Apple’s Operating System.
Windows 2.0
The coming next generations Windows 2.0 was launched in two versions namely Windows 286 and Windows 386 which were named after the architecture they were based on. This was much like the 32 Bit and 64 Bit architecture that we have today. This version too faced stiff competition from Apple and even went to an extent where Apple filed a lawsuit saying that Windows had copied them. The keyboard shortcuts were introduced in this version and mad
Windows 3.0
The Windows 3.0 and Windows 3.1x were good upgrades over the last generation of Windows. This version brought changes like tile overlapping or what we call today as window overlapping. This came in handy with the fact that for the first time memory was allocated virtually to the tile used. Earlier memory on the computer was allocated evenly to all the tiles and kept them running all the time as memory management was quite a hectic task to do. This time it was different as the memory was allocated accordingly to the application in use. This version was more famous than its predecessors and sold around 2 million copies in the first six months of the launch. These numbers were quite compelling by the standards of 1990.
The next Windows 9x was the first time we saw the introduction of the 32 Bit architecture.
Windows 9x
The consumer oriented version called Windows 95 came out in the year 1995. It still had the MS-DOS-based features but the support for the externally plugged hardware devices and drivers was introduced in this version.32-bit applications were also supported and multitasking was a key point that was taken care of in this version of Windows. Another yet memorable thing that happened with this new version of Windows was that it came bundled with the famous Internet Explorer.
The future versions are Windows NT, Windows XP, Windows Vista, Windows 7, Windows 8 and 8.1, Windows 10, and Windows 11 which has launched recently and is still not available officially on most devices as of this date.
Drives
The human brain can store data and information upto 2.5 million gigabytes. The storage capacity of our brain is quite big. At the same time our brain is writing new information every moment into the memory. A PC or Laptop also needs to have some memory or storage to store the data and information on the device so that it can fetch data from the storage unit and carry out the tasks it requires. Even the software too needs to be stored in a storage device to be made. Every digital piece of information needs to have a location to be stored. Without storage devices, we can not imagine the digital world at all. From a small pen drive of 4 GB to the biggest of data centers containing storage units of capacity not upto a few more GBs but to many exabytes.
Any computer constantly needs to read and write data to the storage units in the CPU. A separate memory processing unit is present in the Central Processing Unit to handle the reading and writing of the data and information. Let’s take an example to understand it a bit better. When you write a document in MS Word your system automatically saves it to the last word you wrote.
The same happens when we play a game on our PC or Laptop that has the autosave feature. It automatically saves every move you make in the game and if any error occurs you don’t lose the progress you have made in the game. All this time the system tracks the changes that have taken place and change them in the original place where the original or previous copy of the particular data is present. This process of constant reading and writing of data and information goes on at all moments.
What is a Scan and repair drive?
The origin of this error starts at the startup window of your PC or Laptop. On booting up your device this message shows up which says ‘Scan and repair drive’. The drive here mentioned can refer to any drive you have on the PC or Laptop. Mainly it is referred to the primary storage drive on your PC or Laptop. The name of the drive referred to in the error message is generally mentioned in the error message itself. Thus making it easy to trace the origin of the error and solve it. In general, it refers to the main hard drive disk you have as the primary storage device on your PC or laptop.
What is the cause of the error?
The main cause of this error is the improper shutting down of the PC or Laptop. When you have to force shut down your computer. When your PC or Laptop is functioning it is actively writing and reading data from the drives on your computer and when an instant break is put to this process like in the case of a forces shut down or a power cut, this job of data writing and reading also stops in between and this can cause a malfunction in the drive.
How to Scan and Repair Drive
If you are seeing such an error on the screen of your device, do not panic and follow any one of the methods that are described below with pictorial representation and get it solved by yourself so that you do not need to rush to a tech store near you.
Method 1: Via scan and repair
- Open ‘File Explorer’.
- Go to ‘This PC’.
- Expand the ‘Devices and drives’.
- There you shall see a window named ‘Scan and repair’.
- In this section you shall see the name of the drive that is being scanned and repaired.
- Right click on this drive and open ‘Properties’.
- Click on ‘Tools bar’.
- Select check under error checking.
- The scan shall show that you have some errors . If this is the case then click on the scan drive option to repair the drive and troubleshoot the errors.
- If the scan shows that no error is detected then too you have the option to scan the drive. Select the scan drive option from the next window.
- Restart your PC or Laptop.
Method 2: Through Maintenance
- Open Control Panel.
- Search for Security and maintenance.
- In the new window click on the ‘Maintenance’ icon.
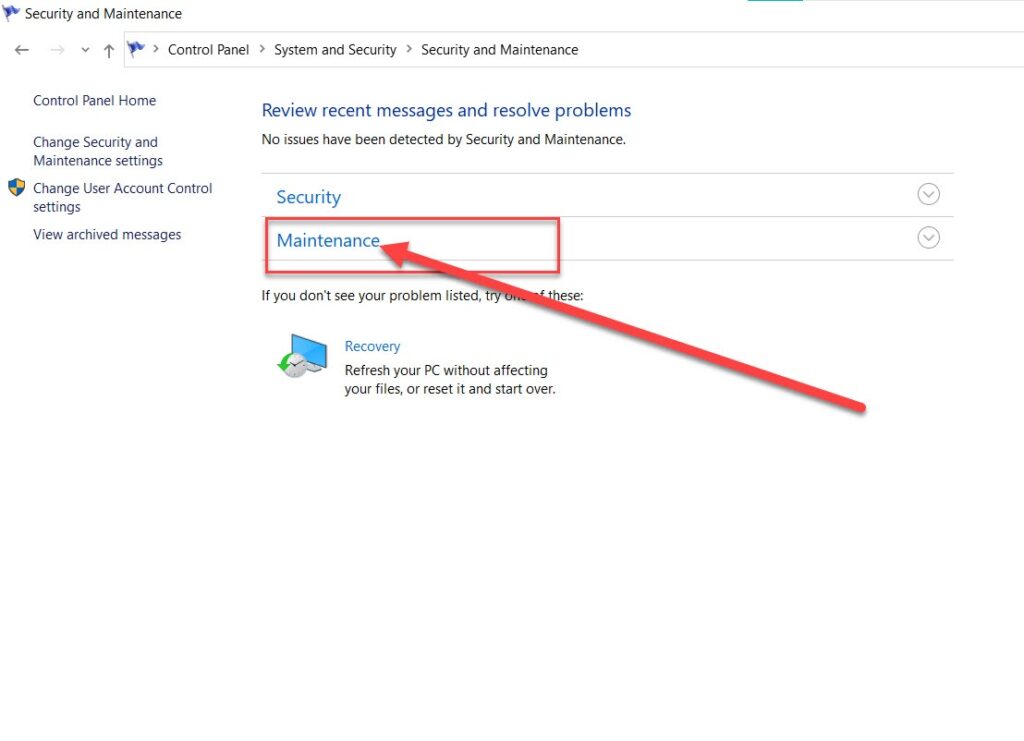
- Inside the Maintenance bar you shall see a link to repair drive. Click on this link to repair the drive.
Method 3: Using CMD
- Open Windows 10 on your PC or Laptop in safe mode.
If you wish to know about how to open Windows 10 in safe mode, scroll down and follow the steps mentioned.
- Press Windows key + R to open Run on your device.
- Enter ‘cmd’ in the writing dialog to open the command prompt.
- Write the following in the command prompt : “chkdsk x: /f”
This will scan and drive the drive. Restart the PC or Laptop and check if the issues have disappeared. If not, then try the next method.4
Method 4: Using Powershell
- Start Windows 10 in safe mode.
- Search ‘Powershell’ and runit as administrator.
- In the windows of the powershell type the following:
“repair-volume -driveletter x
- Replace the x in the above command with the name of the drive you wish to repair or which displays error. Then hit enter.
- When the scanning and repair is complete, restart the PC or Laptop and recheck if the issue has been resolved.
Trying any of the above-mentioned methods may produce the desired results and repair the drive.
If you do not wish this to happen again to you or even want to prevent any such thing from happening in the future then you shall install some specialized software that handles the writing and reading of the drives and also smoothes the performance of the device.
How to open windows 10 in safe mode
- Click on the Windows icon on the Bottom left icon of the taskbar.
- Hold the shift key and click on restart from power option.
- This shall restart the PC or Laptop and will start up the Windows in a blue colored screen.
- On this screen click on the ‘Troubleshoot’ option.
- Under the ‘Troubleshoot’ option click on ‘Startup settings’. This will land you on another blue screen and from this screen select the appropriate number accordingly. In the majority of the cases the number 4 is for enabling safe mode and the number 5 is for enabling safe mode with networking. If you want to have internet access while you are in safe mode then select number 5.
FAQ
Q1. What do I do if my device constantly shows the message ‘Scan and repair drive’?
Ans: Try the above-stated 4 methods and if the problem still persists then you shall try formatting the disk. But only do it if no other option is left as it will erase all the data on the disk.
Q2. How do I find out which drive is being scanned and repaired?
Ans; The name of the drive being scanned and repaired appears on the error message itself but if it does not appear then the drive being scanned and repaired is the primary drive on your system.
Q3. How do I prevent this from happening?
Ans: If you want to have a seamless experience try to prevent the abrupt switching off of your device with the help of a UPS and try not to force shut down to close the PC.
Q4. How do I format a drive on my computer?
Ans: 1. Right-click the respective drive from the ‘This PC’ section of the File Explorer.
2. Click on ‘Format’ from the drop-down menu.