How to split screen on Mac?
If you wish to catch up with today’s fast-paced world and be a successful person in whatever field you may be in it is very crucial to know how to control your time and how not to be controlled by it. For this you are required to have some really good time management skills, one of those is the ability to multitask, which if put into simple words means being able to do multiple tasks at the very same time. I am pretty much sure most of us practice this invaluable skill of multitasking in our day-to-day lives. And today we are going to show you all how to do exactly the same thing on your Mac by using the split screen feature on your Mac.
This feature in the Mac is officially known as “Split View”. It allows you to use the full potential of your Mac screen and maximize your productivity by dividing the screen into two halves that can hold two completely different app windows and let you work on both the apps simultaneously and synchronously. This could be in the case with any applications that support the split view feature like you can chat with your friends while checking live scorecards on the internet or take a glance at the data while preparing your presentation and many more.
The feature proves to be very useful as it reduces the time and effort when compared to the process of juggling between windows while multitasking which is a very tedious and time-consuming process.
In this article, we will cover how to start, use, work and exit the split screen mode. We will also discuss drawbacks and the common problems that new users face. So, make sure you read this article till the end.
How to start using the split screen on Mac?
For macOS Catalina or later:
- Take your pointer to the top-left corner of the window which you are presently working on. You will see the sizing buttons, three colored buttons red (used to close the app window), yellow (used to minimize the window and place it in the Dock and green (used to view the window in full-screen mode or to resize it to its logical size).
- Move around or click and hold the pointer over the green full-screen button
. A drop-down menu will appear with the options “Enter Full Screen”, “Tile Window to Left of Screen” and “Tile Window to Right of Screen”. You may see additional options if you have an external display or device connected to your Mac.
- Choose the “Tile Window to Left of Screen” option from the menu if you want your current window to be on the left-hand side of the split screen view or if you want it to be on the right-hand side then choose the “Tile Window to Right of Screen” option.
- The other half of your screen will then display the other active app windows that support split screen viewing. Now select the app window which you want to use simultaneously on the other half of your screen.

And that is it, you are good to go with your split screen mode for multitasking.
For older versions of macOS (Mojave, High Sierra, Sierra, or El Capitan):
- Take your pointer to the top-left corner of the window you are currently working on. Click on the green full-screen button and hold it until the window shrinks.
- Now you will be able to drag the app window to either side of your screen. Drag the window to the left or right-hand side of the screen, whichever side you prefer to put on the window, and release the pointer.
- Then just select another app window that you want to work on over the other half of the screen and you will see it fit in the rest of your screen.
The keyboard shortcut for split view:
- Press Ctrl + command + F, it will take the screen you are currently on into full-screen mode.
- Then press the Mission Control key F3 to enter Mission Control. From there choose any app of your choice to view in split screen mode and drag it onto the window that you just converted into full-screen.
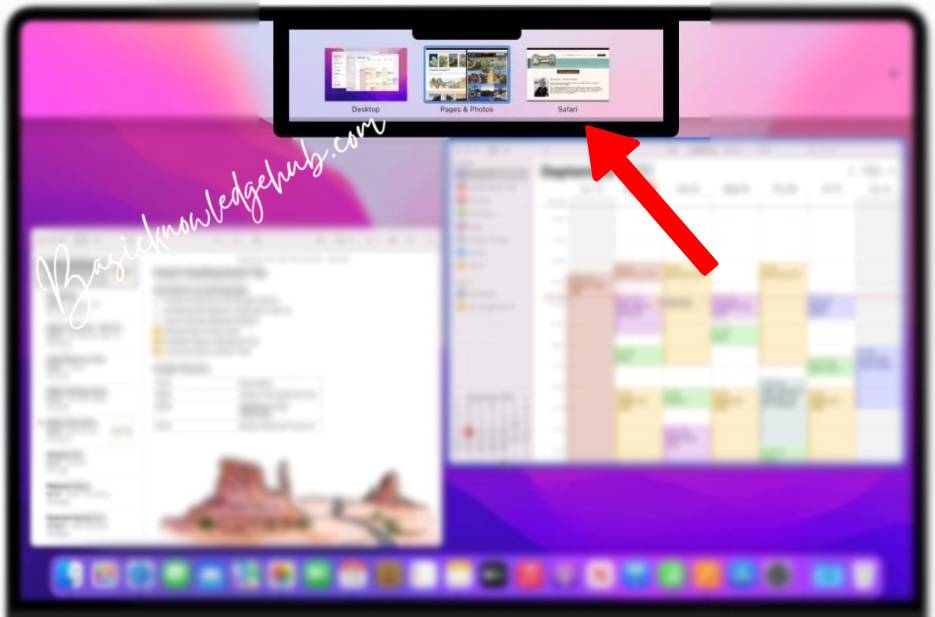
- Click on the thumbnail of the app combination you created to view it in split screen mode.
- You can also create your own keyboard shortcut.
- Go to System Preferences > Keyboard > Shortcuts > App Shortcuts.
- Now click the “+” button and add the command “Tile Window to Left/Right of Screen” using the shortcut you wish to use.
- After you have done this you just need to click the same shortcut key you created and you will be switched to split screen mode directly.
How to use & work in split screen mode?
Now when you know how to enter and start the split screen feature on your Mac let’s learn how to use this feature and make the most out of it.
How to switch to another set of windows while in split screen mode?
Consider you want to work on another set of app windows in split view while already on a full-screen split view, you can easily do that by following these steps:
- Swipe up with your four fingers on the trackpad, this would take you to Mission Control. The Mission Control can also be accessed in other ways while working in split screen mode for switching to another set of app windows in split view:
- Using the Mission Control key on the keyboard, F3.
- Pressing Ctrl + upward arrow key.
- If you are using a magic mouse then you also view Mission Control by double-tapping with two fingers on it.
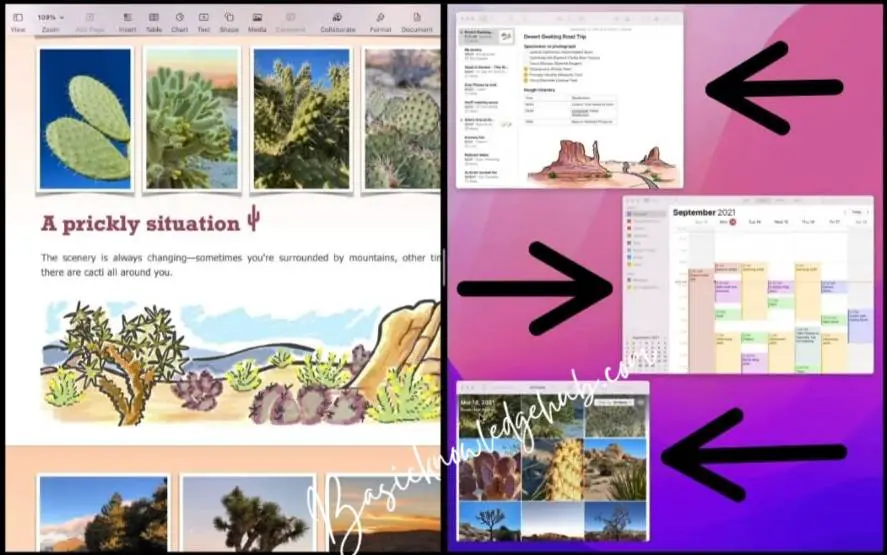
- Then you would be able to see the app windows which are already in split screen mode and the windows which are not.

- Drag the window which you want to see in split view onto the thumbnail of the full-screen window which also you want to work on simultaneously.
- Then simply click on the set of windows you want to work within a split view and they will appear side by side on your Mac screen.
Learn More: AirPods won’t connect to MacBook
You can also change only one of the app windows in your current split-view setup:
- Hold your pointer over the green full-screen button in the upper left corner of the window that you want to switch and select the “Replace Tile Window” option. Your screen will display the other open app windows that support the split view feature.
- Then just click on the window that you want to work on.
Swipe with three fingers to the left or right on your trackpad to view another single app window in full-screen mode or a set of windows in split view space set up already by you. This may not happen if you have changed your accessibility settings to “Enable Drag Lock” you need to do this with four fingers instead of three.
Other use cases of split screen in Mac:
There are many other actions that you can perform while working on split view like switching the sides of the app windows or adjusting the size of one window according to your need. Let’s see how to do these activities.
- To switch the sides of the app windows in split screen mode move your pointer to the top edge of any one of the two windows and just drag the toolbar to the other side.
- If you want a window to take up more space in the split screen mode you can do that too. Just drag the vertical line between the windows according to your requirements and convenience.
- It is also possible to work synchronously between both the active windows while they are in split view. Suppose you want to move an image from your photos to a note in the notepad, select the photo using the pointer and drag it to your notes, as simple as that. This was just an example you can work out this similarly on other applications too.
- If you need to work on more than two windows at the same time, that can be done too. You can size the windows according to your convenience and need to fit three or even four app windows at a time.
How to exit a split screen?
So, after learning how to start and work on the split screen mode it is my turn to learn how to exit a split screen.
- Take your cursor to the top edge of any one of the two active app windows until the gray menu bar appears to view the colored window buttons.
- Press on the green full-screen button. That window will immediately exit the split screen mode and the other app window will convert to a full-screen view.
- You can then use Mission Control to view the other app windows in full-screen mode. This action can also be performed by using multi-touch gestures like swiping four of your fingers left or right over your trackpad.
However, you can also click on the red button to close the window and exit split screen mode.
An alternative way to exit split screen mode:
There are other ways too for exiting from the split view mode. You can swipe up with four fingers on your trackpad to open Mission Control then hold your pointer over the thumbnail of the windows that were used in the split view until a gray expand arrow appears over it. Just click on it to close the split view space and return to the desktop.
Drawbacks of using split screen mode
- Opening multiple windows in a screen may make your screen look cluttered and disorganized.
- To deal with the problem I mentioned in the above point you may consider buying an additional monitor to connect with your computer externally which would increase your cost.
- Getting an additional monitor will also increase your space consumption.
- Working with multiple app windows open on your screen at a time can affect the speed and performance of your machine.
- And like we all know, with every great power comes greater responsibilities. So is the case with this amazing feature. Some people, especially youngsters may get this to impact their lives and careers in a bad way rather than all the good ways. Frequently trying to do multiple things at the same time may result in the loss of one’s focus and attentiveness by creating potential distractions.
Problems faced by users and their solutions
While trying to improvise these processes to use the split view feature you can face some problems. In order to help you all with these problems and make sure you have a good and hassle-free experience, we have tried to address the most common problems that are normally faced by new users.
- Before proceeding with anything you must check that you are not working in a full-screen window already, otherwise the feature will not work.
- You may also have different system settings set on your Mac. Go to System Preferences > Mission Control and check if the “Displays have separate Spaces” option is enabled. If you do not see that in the Mission Control menu, it is probably because you are using an older version of macOS. Update to the latest version to enjoy this feature.
- Lastly, keep in mind that not all applications support the split view, therefore these apps cannot be viewed in split screen mode.
Conclusion
As I have said at the beginning, being able to multitask is very crucial these days in order to be more productive in your work. I am sure this tutorial on how to use split screen on Mac will add great value to you and your time management skills somewhere and take them to another level.
I hope after reading this article now you will very easily be able to use the invaluable feature of split screen on Mac to maximize your productivity and use your and your screen’s full potential.
Thank you for joining with Gossipfunda, as we keep bringing to you such interesting and useful technical topics. Goodbye as of now, stay tuned!