error: espcomm_upload_mem failed
The developers of IoT caught up with an error: espcomm_upload_mem failed. It is an upload failed error. It pops up when someone is uploading his/her code script to the Node MCU board. In this article, I will show you how to remove this error so that it will make your IoT journey somewhat easy.
Many a time, beginners in this field face many problems. This is common because, when you start learning something new your doubts should come up. IoT, in the beginning, was only limited up to research laboratories of universities. But, as time passed anyone can now learn and implement it. Problems also made their way while the development was going on. Creating and running code is quite handy, the creator fears only one thing which is Errors and Error Handling.
Fix error: espcomm_upload_mem failed
Most commonly the beginners and sometimes even the intermediates in the field of IoT are facing some of the problems. The talks on the table were more on this error namely error: espcomm_upload_mem failed. This is an upload error. When the user after writing the code comes uploads it to the cloud server this error occurs sometimes.
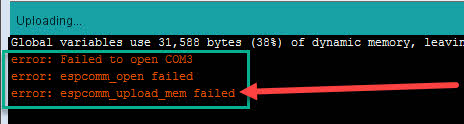
This error comes while uploading the code to the Node MCU board or ESP8266 module.
Note: You can use these solutions for any ESPxxxx board but make sure to use the Arduino IDE.
For ESP8266 module:
Improper installations of the drivers.
When using an IDE it should be proper on its own. The drivers get installed automatically when the IDE is installed. So you should take care that you choose a proper version. For an instance check the ratings, surf more about it, determine what it supports and whatnot.
Damaged Cable:
Always check the cable connected to the board. Try making a simple program of LED blinking and then uploading the code on your board. If it does not shows the board then the cable is damaged and it needs replacement.
Pin Connections:
There are some of the important connections when you are using the ESP2286 board with the Arduino board.
Try these connections:
The GPIO 0 pin of the ESP2286 must be connected to the ground GND.
The GPIO 0 pin is secondly a Flash pin. When we power up the code set it to HIGH, it checks whether a code is there in the module. If the old code is there, it tries to execute that code. But, when it is set to reset after getting powered up it gets cleaned and waits for new code.
The reset pin of the Arduino board must be connected to the ground GND:
Whenever the code is uploading from Arduino IDE to the board it resets the chip on it. After resetting the chip, it waits for another incoming code. In this way, the new code gets uploaded and it makes a path to the proper processing. Because we are programming the chip on the ESP2286 and not the chip on the Arduino board.
The port will automatically appear in the port section. Select the port, then select the Node MCU board in the board section and upload the code.
For Node MCU board:
Types of boards:
- ch340 driver IC
- cp2102 driver IC
To correct the error, try these simple steps:
Check the cable condition ( Micro USB is used ):
Connect the cable to your mobile phone and other to the computer. If the computer detects the device, then the cable is perfect. Otherwise, it needs to be replaced.
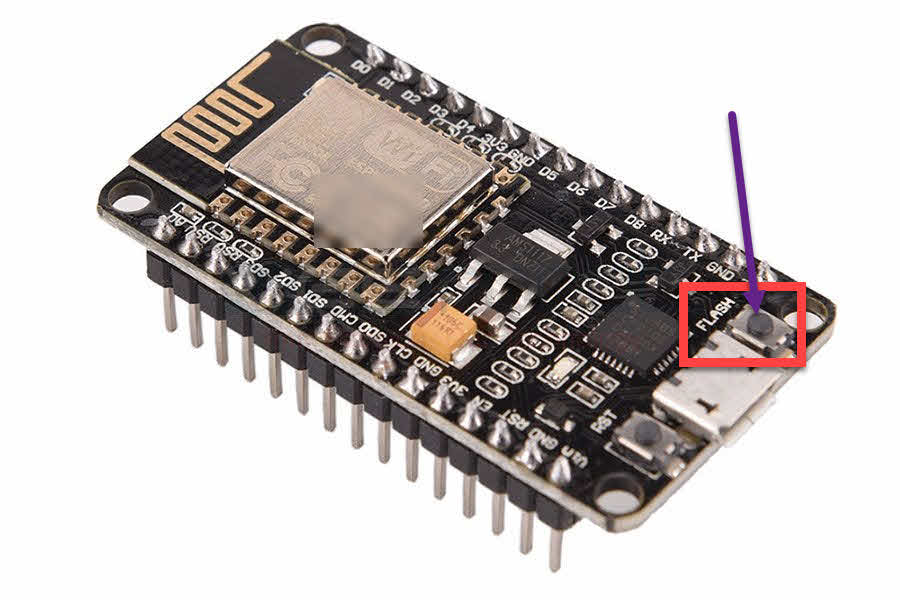
Flash button:
The flash button on the ESP2286 module connects the GPIO 0 pin and ground. While attaching the USB cable to the computer with the board press the flash button. Keeping it pressed plug the USB into the computer and then release it. The port will automatically appear in the port section. Select the port, then select the Node MCU board in the board section and upload the code.
Conclusion:
This was all the error: espcomm_upload_mem failed and its solution. Error solving and debugging is one of the key skills one should indulge. For some problems, the programmer community is always there to help.