Easy steps to remove Bing from Chrome
There I was, one lazy Sunday morning, sipping my freshly brewed coffee and trying to catch up on the latest news, only to be faced with the all-too-familiar annoyance of Bing popping up as my default search engine in Chrome. I couldn’t help but think, “Why, oh why, must you invade my precious browsing experience, Bing?” It was at that moment I decided to take matters into my own hands and find a way to remove Bing from Chrome once and for all.
Now, I understand that many of you may have found yourselves in similar situations, and trust me, there’s no shame in admitting it. After all, we’re all friends here, and friends help each other out, right? So, fear not, fellow internet warriors, for I have ventured deep into the realm of search engine configurations and emerged victorious, armed with the knowledge to set you free from the clutches of Bing. If you too are seeking an escape from this pesky search engine, worry not; here are the steps you must take to liberate your Chrome browsing experience.
Reason 1: Unintentional Installation of Browser Extensions
One of the most common reasons behind Bing’s unwelcome intrusion into your Chrome experience is the unintentional installation of browser extensions. These pesky add-ons can sneak in while you’re installing other software or visiting certain websites.
Here’s how to identify and remove such extensions:
Step 1: Open the Chrome Extensions Page
Open your Chrome browser and click on the three-dot menu icon in the top right corner. Select ‘More tools’ and then click on ‘Extensions.’

Step 2: Examine the Extensions
Review the list of installed extensions, keeping an eye out for any unfamiliar or suspicious-looking ones, particularly those associated with Bing.
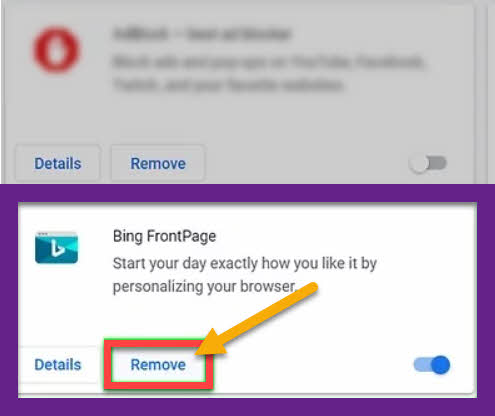
Step 3: Remove Unwanted Extensions
To remove Bing from Chrome, click on the ‘Remove’ button beneath its description. Follow the prompts to complete the process.

Reason 2: Changes in Chrome’s Search Engine Settings
Sometimes, Bing becomes the default search engine in Chrome due to changes in the browser’s settings. Here’s how to revert to your preferred search engine:
Step 1: Access Chrome’s Settings
Click on the three-dot menu icon in the top right corner of Chrome and select ‘Settings.’
Step 2: Locate the Search Engine Section
Scroll down to the ‘Search engine’ section or type ‘search engine’ in the search bar at the top of the Settings page.
Step 3: Change the Default Search Engine
Click on the drop-down menu next to ‘Search engine used in the address bar‘ and select your desired search engine, such as Google or DuckDuckGo.

Reason 3: Third-Party Software Altering Chrome’s Settings
Occasionally, third-party software can change Chrome’s settings without your knowledge or consent. To rectify this, you’ll need to reset Chrome to its default settings:
Step 1: Navigate to Chrome’s Advanced Settings
In the ‘Settings’ menu, scroll to the bottom of the page and click on ‘Advanced.’
Step 2: Find the Reset and Clean Up Section
Locate the ‘Reset and clean up’ section near the bottom of the Advanced settings.
Step 3: Reset Chrome Settings
Click on ‘Restore settings to their original defaults’ and then confirm your decision by clicking on ‘Reset settings.’

Conclusion
And there you have it—a detailed guide on how to remove Bing from Chrome, allowing you to reclaim your browsing experience. By following these steps, you can rid yourself of unwanted extensions, restore your preferred search engine, and even reset Chrome to its original settings. Keep in mind that staying vigilant about the software you install and the websites you visit can help prevent future encounters with Bing or other undesired search engines. With a more streamlined and enjoyable browsing experience, you’ll be free to explore the internet without any unnecessary interruptions.


