$Recycle.Bin folder
The recycle bin system is mainly intended to dispose of recyclable items and use them later for creating more products. The same rule applies to our devices. We have a recycle bin in our systems that will store our deleted files for some time before we delete them permanently. In this article, we will see about the hidden recycle bin folder that is $Recycle.Bin folder, its importance, how to access it and delete files from it.
But not all the system files are stored in the main recycle bin. Some of them go into a hidden folder that is not easily visible. But if we do something in our system, this folder can be uncovered and it is not really recommended to view it as such.
We often confuse this folder with a virus. To say the truth, it is not a virus but just an unfortunate protected folder that happened to get into our way. It is a very important folder for our system and it is necessary to keep it.
What is Recycle bin?
Recycle bin is an app that stores the deleted files from our computer temporarily. Its major function is to let us restore accidentally deleted files. Recycle bin contains some hidden folders that can’t be found easily. They also store deleted files and these folders are called the $Recycle.Bin folder.
Only deleted files from specific drivers will be stored in the $Recycle.Bin folder. As it is a hidden folder, we can’t easily access it to retrieve deleted files. But it is possible the same way as Recycle bin.
But sometimes, retrieving files from the $Recycle.Bin folder can be an easier process as it stores much fewer deleted files than the Recycle bin.
Don’t miss:
What is the $Recycle.Bin folder?
It is a very important folder in your system that enables you to recover the deleted files from your device drivers. As we have discussed earlier, recycle bin stores your deleted files temporarily and if you delete those files from the recycle bin, they will be gone permanently. $Recycle.Bin folder works the same way as Recycle bin, we can retrieve deleted files from it and permanently delete unwanted files. The only difference is its hidden nature that makes the access difficult.
But the $Recycle.Bin folder is different from the recycle bin as it is specific to different drivers. For example, in your computer, some drivers like C Drive, D Drive store necessary files. In all these drives, the $Recycle.Bin folder is present as a hidden folder. It stores the deleted files from these drivers and enables you to recover them.
In a nutshell, we can say that the $Recycle.Bin folder functions like a recycle bin specifically for each drive or folder. If you want to recover any particular files from specific folders, you can use the $Recycle.Bin folder.
Is the $Recycle.Bin folder a virus?
We all might have heard about the “$Recycle.Bin virus” and the “removal of the $Recycle.Bin virus”. But actually, the $Recycle.Bin folder is not a virus. It is as we discussed earlier, a very essential folder in our system. It is generally a system security folder and is misjudges as a virus when it is accidentally seen by us.
Removing this folder is not possible. But, if we somehow manage to remove it, our PC will be affected greatly. So then what is “the removal of the $Recycle.Bin folder”?
It necessarily means the hiding of the $Recycle.Bin folder. In the process, we try to revert whatever operation is that we have done which led to the visibility of this folder.
How to access the $Recycle.Bin folder?
You can easily retrieve files specific to folders from the $Recycle.Bin folder as it has lesser items than the recycle bin. For that, you need to access the $Recycle.Bin folder, and the ways to do that differ with respect to the Windows version.
In Windows 7
Now window 7 is no more supported by Microsoft still, it is used by some users, Let’s see the access:
Step 1: Open Windows Explorer.
Step 2: Go to the operating system drive and press Alt.
Step 3: Choose the tools option from the Menu bar.
Step 4: Go to the Folder option.
Step 5: Click on the View tab.
Step 6: Next, choose the radio button and it will show all the hidden files and folders.
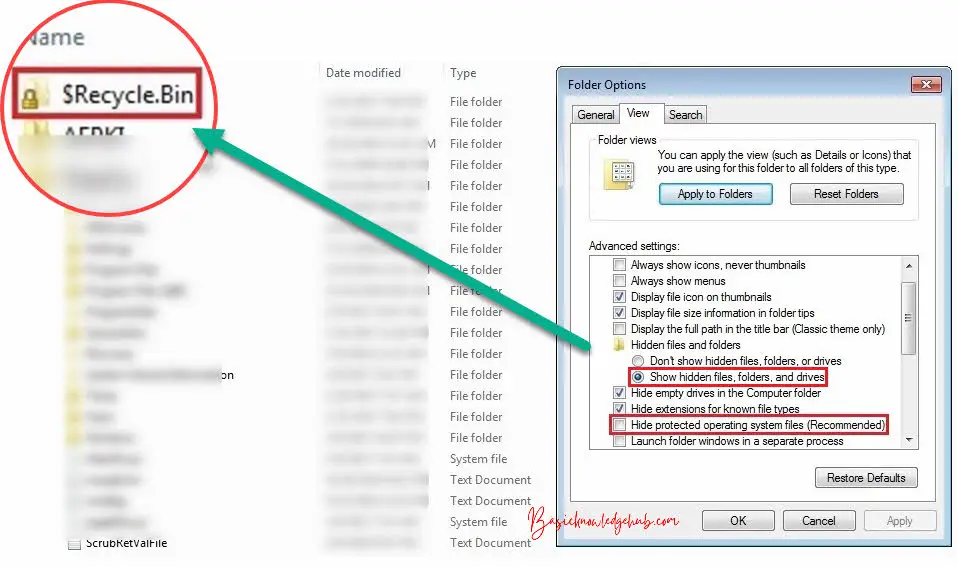
Step 7: Then, uncheck the box Hide-protected operating system files.
Step 8: Click OK.
In Windows 10 Drives
To access the C Drive and D Drive $Recycle.Bin folders, follow the given steps:
Step 1: Go to your system files and choose the C or D drive.
Step 2: Click on the View Tab.
Step 3: Choose Options and then Choose folder and search options.
Step 4: Choose View and uncheck Hide protected operating system files.
Step 5: Click OK.
External hard drives
If you use an external drive due to insufficient storage, the deleted files can be accessed from the $Recycle.bin folder. Follow the given steps to know how to access the deleted files from your external hard drive.
Step 1: Go to Start and then to Control Panel.
Step 2: Choose the option Folders.
Step 3: Click on Show hidden files and folders.
Step 4: Uncheck Hide protected operating system files.
How to clean $Recycle.Bin folder?
If you can delete all the files from the $Recycle Bin folder, you will save a lot of space on your device. Hence, it is important to know how to clean the $Recycle Bin folder. Before deleting, make sure that you access the folder using the above steps.
Delete manually
You can clear the $Recycle Bin folder manually in a few steps. First, access the folder using the above methods. Then, select all and press Delete.
Using command line
You can delete all the $Recycle Bin folder files through commands. For that, first, open the command prompt as administrator and type the specific commands which are given below.
From system drive:
// rd /s /q %systemdrive%\$RECYCLE.BIN
From the D drive:
// rd /s /q d:\$RECYCLE.BIN
From the C drive:
// rd /s /q C:\$Recycle.bin
On all users:
// @echo off
// for /D %%D in (“C:\*”) do rd /Q /S “%%D\$recycle.bin” 2>nul
How to hide the $Recycle.Bin folder?
Hiding the folder can be an easier process than deleting it and is the recommended thing to do. If you have accessed the folder, it is now time to hide it.
Step 1: Go to This PC.
Step 2: Click on the View Tab.
Step 3: Choose Options and then Choose folder and search options.
Step 4: Choose View and check to Hide protected operating system files.
Step 5: Click OK.
Frequently asked questions
Here, we will discuss some common questions asked by the users and their answers.
Is it safe to delete files in bins under $Recycle.Bin?
It depends on the files actually. You can delete the files from the $Recycle Bin folder if you are an admin user. But, make sure that the removal of these files will not cause any distortion in your system as once deleted, they cannot be retrieved.
Is the $Recycle Bin folder present in mobile phones?
$Recycle Bin folder is a feature in Windows Operating System for storing deleted files temporarily. It is not present in Android or iOS and hence you can’t find the feature on your phone.
How can I access the $Recycle Bin folder?
You can access the $Recycle Bin folder by various methods depending on the location and your system. A detailed explanation is given in the earlier paragraphs of this article.
Conclusion
Misjudging anything can cause serious problems. When it comes to the $Recycle Bin folder, if you think that it is a virus and try to delete it manually, it can lead to many issues in your device. As we have discussed earlier, the $Recycle Bin folder is an operating system security folder present in Windows that is very much essential.
The major use you can find with the $Recycle Bin folder is that it helps you receiver specific files from folders that you need rather than searching from a pile in the recycle bin. It is very much beneficial to save time and effort in this way.
Make sure to read the complete article and know the real details about this folder and how to manage it. Misinformation may lead to serious trouble. If you are trying to delete the folder, ensure that all the given steps are read and understood completely before attempting it. Being safe is the best way to take care of your device.