Windows Background Error Sound – How to fix
Encountering a background error sound on your Windows computer can be both confusing and frustrating. This sound typically indicates that an error has occurred, but it’s not always clear what the issue is or how to resolve it. Fortunately, there are several steps you can take to diagnose and fix this problem. This article provides a comprehensive guide to help you silence the unwanted background error sound on your Windows PC.
Understanding the Windows Background Error Sound
Before diving into the solutions, it’s essential to understand what the Windows background error sound represents. This sound usually occurs when a program or process running in the background encounters a problem or crashes. The sound is a notification from Windows indicating that something has gone wrong.
How to fix Windows Background Error Sound
Check for Active Error Messages
To check for active error messages on a Windows computer, follow these steps:
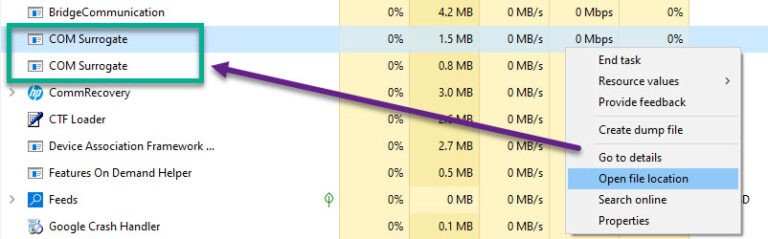
- Look for Pop-up Windows:
- Check if there are any pop-up windows or dialog boxes on your screen. These often accompany the error sound and may appear minimized in your taskbar.
- Click on any such items to bring them to the foreground and read the error message.
- Check the Notification Area:
- Look in the notification area (system tray) at the bottom-right corner of your screen.
- Sometimes, error messages or notifications can appear here. Click on any relevant icons that might indicate an issue.
- Use the Action Center:
- Windows 10 and later versions have an Action Center (accessible by clicking the speech bubble icon in the bottom-right corner).
- This center consolidates notifications and alerts, including system warnings or error messages.
- Review Taskbar Icons:
- Some applications display their status or error messages through their taskbar icons.
- Hover your mouse over each icon in the taskbar to see if any show error-related tooltips.
- Check Open Applications:
- Sometimes, an application might encounter an error and display a message within its window.
- Briefly switch to each open application to see if any of them display an error message.
Read more: Wifi not working on tv but working on other devices
Open the Event Viewer
Opening the Event Viewer on a Windows PC is a straightforward process. Here’s how you can do it:
- Using the Run Dialog:
- Press the
Windows key + Ron your keyboard to open the Run dialog box. - Type
eventvwr.mscin the text field and pressEnteror clickOK. This will launch the Event Viewer.
- Press the
- Through the Start Menu:
- Click on the Start menu or press the
Windows key. - Type
Event Viewerin the search bar. - Click on the
Event Viewerapp from the search results to open it.
- Click on the Start menu or press the
- Via Control Panel:
- Open the Control Panel (you can search for it in the Start menu).
- Go to ‘System and Security’ > ‘Administrative Tools’.
- Find and double-click on
Event Viewer.
- Using Windows PowerShell or Command Prompt:
- Open Windows PowerShell or Command Prompt (you can find these by searching in the Start menu).
- Type
eventvwrand pressEnter.
Run the Windows Troubleshooter
Running the Windows Troubleshooter is a helpful way to diagnose and resolve common issues on your Windows computer. Here’s how to do it:
- Press the
Windows keyto open the Start menu. - Click on the
Settingsgear icon. - Navigate to
Update & Security. - Select
Troubleshootfrom the sidebar. - In Windows 10, click on
Additional troubleshooters. In Windows 11, proceed to the next step. - Choose the relevant troubleshooter (e.g.,
Playing Audio). - Click
Run the troubleshooter. - Follow the on-screen instructions.
- Apply any suggested fixes.
- Restart your computer after completing the troubleshooting process.
Update Drivers and Windows
Updating drivers and Windows is a crucial step in maintaining your computer’s performance and resolving various issues. Here’s how to do it:
Updating Windows:
- Open Settings: Press the
Windows keyand click on theSettingsicon (gear symbol). - Navigate to Updates: In the Settings menu, select
Update & Security. - Check for Updates:
- In the Windows Update tab, click on
Check for updates. - If there are any updates available, Windows will automatically start downloading them.
- In the Windows Update tab, click on
- Install Updates:
- After the updates are downloaded, you might be prompted to install them. Follow the on-screen instructions to complete the installation.
- Some updates may require a restart to finish the installation.
Updating Drivers:
- Open Device Manager: Right-click on the Start menu and choose
Device Manager. - Find Devices:
- In Device Manager, look through the list of devices for any with a yellow exclamation mark, indicating a driver issue.
- Even without exclamation marks, it’s a good practice to regularly update drivers for key components like display adapters, network adapters, and sound, video, and game controllers.
- Update Driver:
- Right-click on the device you want to update and select
Update driver. - Choose
Search automatically for updated driver software. Windows will then search for and install any available updates.
- Right-click on the device you want to update and select
- Alternative Method: Some drivers may not update through Device Manager. In such cases, visit the manufacturer’s website for your hardware and download the latest drivers from there.
- Restart Your Computer: After updating your drivers, restart your computer to ensure all updates are properly applied.
Keeping your Windows and drivers up to date is essential for system stability and can often resolve many common issues, including background errors.
Perform a Clean Boot
Performing a clean boot in Windows can help you troubleshoot software conflicts that occur when you install a program or an update, or when you run a program in Windows. It starts Windows by using a minimal set of drivers and startup programs. Here’s how to perform a clean boot:
- Log in as Administrator:
- Ensure you’re logged into your computer as an administrator.
- Open System Configuration:
- Press
Windows key + Rto open the Run dialog box. - Type
msconfigand pressEnteror clickOK.
- Press
- Configure Selective Startup:
- In the System Configuration window, click the
Servicestab. - Check the box to
Hide all Microsoft services. - Click
Disable allto turn off all non-Microsoft services.
- In the System Configuration window, click the
- Disable Startup Programs:
- Go to the
Startuptab and click onOpen Task Manager. - In the Task Manager, under the
Startuptab, disable all the startup items. You can do this by right-clicking on each item and selectingDisable. - Close Task Manager.
- Go to the
- Apply Changes:
- Return to the System Configuration window.
- Click
OK.
- Restart Your Computer:
- Restart your computer to apply these changes. Your computer will start in a “clean boot” environment.
- Troubleshooting:
- After restarting, you can perform troubleshooting steps to identify the problem.
- If your computer works fine in clean boot state, it indicates that one of the disabled services or startup items was causing the issue. You can enable services and startup items one by one or in small groups and restart your computer after each change to identify the problematic software.
- Restore Normal Startup:
- Once troubleshooting is complete, don’t forget to reset your PC to start normally.
- Open System Configuration again (
msconfig). - On the
Generaltab, selectNormal startup. - Click
OK, and then restart your computer.
Check for Malware
Checking for malware is an essential part of maintaining your computer’s health and security. Here’s how you can perform a malware scan on a Windows PC:
- Open Windows Security:
- Press the
Windows key. - Type
Windows Securityand select the app.
- Press the
- Select Virus & Threat Protection: In Windows Security, choose
Virus & threat protection. - Start a Quick Scan: Click on
Quick scanto start a basic scan of your system. - Opt for a Full Scan (Optional):
- For a deeper scan, select
Scan options. - Choose
Full scanand then clickScan now.
- For a deeper scan, select
- Use Third-Party Antivirus Software (If Available):
- Open your antivirus program.
- Select the option to run a full system scan.
- Ensure Antivirus is Updated: Check for updates in your antivirus software before scanning.
- Review Scan Results: After the scan completes, check the results for any detected malware.
- Perform Recommended Actions: Follow the antivirus software’s recommendations to remove or quarantine threats.
- Consider a Secondary Scan: Use an additional malware scanner like Malwarebytes for a second opinion, if necessary.
- Schedule Regular Scans: Set up regular scans in your antivirus software settings.
- Keep Software Updated: Regularly update your antivirus and Windows operating system.
Conclusion
Troubleshooting the Windows background error sound requires a bit of patience and detective work. By following these steps, you can identify and resolve the underlying issue causing the sound. Remember, regular system maintenance, like updating drivers and scanning for malware, can prevent many of these issues from occurring in the first place.