Hard reset note 10- Without losing the data
The steps in this article will teach you how to hard reset your Samsung galaxy note 10. Learn to conduct a hard reset using hardware buttons and Android Pie configurations. As a consequence, the SAMSUNG Galaxy Note10 would appear to be fresh, and the Qualcomm Snapdragon 855 core will be the best. Whenever the client wanted to reset the gadget to its prior configuration, he or she did a hard reset. What’s the point? For a while but then, the device’s functionality will fall below. And then at this point, the right course of action is to clear this in some way. Furthermore, users might occasionally encounter serious issues which could only be resolved by restoring the phone to factory default configurations.

Don’t miss our tutorials on Reset:
- How to reset a Samsung Device?
- How to reset my MacBook?
- This device was reset. To continue sign in with a google account bypass
Hard Reset
Here factory reset, often referred to as nothing more than a hard reset or master reset, seems to be the process of returning a gadget to its original condition. Any user-added configurations, apps, and information are deleted. Even though most people associate the phrase with mobile phones and tablets, it could also apply to different types of computers, as well as several other digital types of equipment.
A factory reset can be done in a variety of ways, based on the gadget, or it can be accessed through some kind of gadget or operational protocol stack. For instance, Android Hard Reset wipes all configurations, user data, 3rd party apps, and related program files from such an Android phone’s inner flash storage.
The much more frequent cause for restoring factory configuration is to repair a broken gadget or to delete customer information while reselling, or discarding of, or returning the gadget to the maker. Factory reset differs from soft reset, which simply involves restarting a gadget.
Hard Reset Vs Soft reset
The Soft Reset: The much more fundamental reset, that could resolve a variety of small difficulties that may arise during cell phone usage. While seeking to resolve a problem on a cell device, the Soft Reset is always the primary reset and frequently the very first stage in debugging. This seems to be essentially a power cycle, when the device is turned off and then turned on again. The device’s information is just not lost as a result of the Soft Reset.
The Hard Reset: This is generally the last option and the final reset to attempt after all sorts of reset have failed to solve the problem. The Hard Reset is used to resolve major software issues which may arise on cell devices. Hard reset wipes off all customer information and restores the device to factory default state.
Multiple methods to hard reset note 10 without losing the data.
However, the technique does have the significant disadvantage of wiping out almost all of the phone’s storage. As a result, you’ll really have to understand how to hard reset note 10 without losing any information. And you’ll learn that in this article. Learn how to completely reset your phone without losing your information in this article. Keep scrolling.
Method 1: Check to see if the device really does have a feature.
Although the device’s makers are aware that restringing the device is a difficult task. Even so, preserving the information necessitates a great deal of effort. As a result, several businesses are developing tools that allow users to save the information from the reset procedure. With the current systems, which is becoming more frequent.
Check for such an extension called factory reset configuration choices while you’re at the factory reset page in configurations. Users would be able to retrieve the cell phone without erasing whatever information if it really is there, even if it has various things in different versions. Inside this instance, just the device’s configuration would be reset to original defaults, and some Cache memory will indeed be freed up.
- Step 1: On the cell phone, open the Settings application.
- Step 2: Select the Additional setup option after scrolling until one can see it.
- Step 3: Select the Backup and Reset choice immediately.
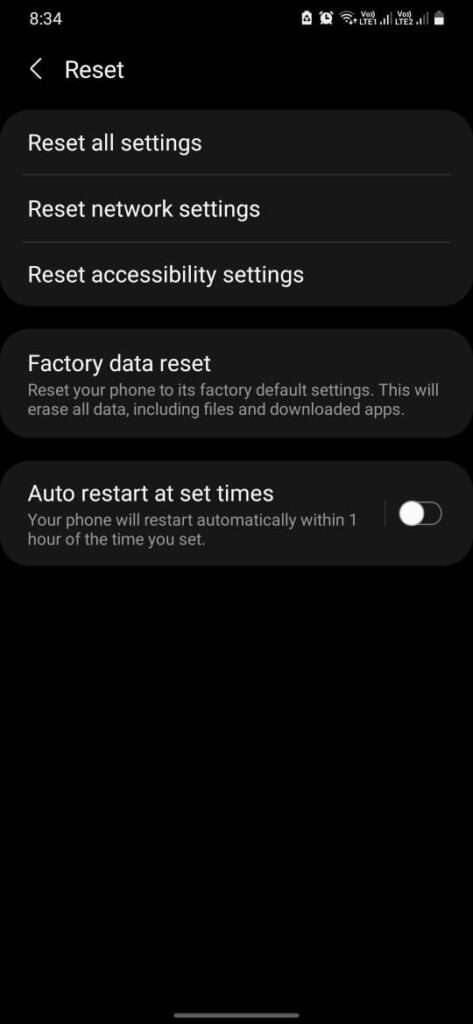
- Step 4: The choice to Reset to Factory Settings is located at the bottom of the display. Choose this.
- Step 4: Then navigate to the backup and reset option and select it.
- Step 5: Lastly, among several choices, select Reset System Setting Exclusively.
Additional alternatives, such as the Erase All Information choice, are located beneath this alternative. And selecting this option will ensure that the device is clear of any information.
Method 2: Creating a backup of the documents on a Memory card or a computer
That would be the other way for backing up the data securely before doing a hard reset note 10. It is indeed helpful as, because this is a rapidly developing area across cell phones, several older devices may not have had the Reset System Configuration Just choice or something comparable. However, users must continue to back up the information they require.
Using a micro sd card is a fantastic choice because one won’t have to have a decent internet speed to finish the mission. Users can also do that even if they do not have any access to a computer. However, because most users are not using micro sd cards larger above 16 GB, and cell phones’ internal capacity is significantly larger, the possibilities of all the information being transferred to the storage device are slim. If this is the situation, you’ll have to use a computer.
To transmit the data to the Desktop computer, you’ll have to have an USB cord. The Computer could manage all that you have to give since it has a bit more room. If users don’t really have access to the computer, rent it from a colleague.
One can simply transfer the contacts to the storage device. Once you’ve finished transferring all data, navigate to the settings and perform a hard reset.
Method 3: Using dr.fone to create a backup
Dr.fone features a number of applications which are aimed to assist users with multiple tasks on the cell phone. There are also variants of the programme made to root cell phones and recovery file systems. We will focus on something that assists users in backing up their data. Users could use it even if users don’t want to hard reset note 10.
The key benefit of dr.fone none of the different solutions offer is the ability to store items such as texts and call logs.
- Step 1:Install the application after downloading it from the online webpage.
- Step 2:Next, using a USB cord, establish a contact across the cell phone and the Computer.
- Step 3:Then, launch the application and select Phone Backup from the menu.
- Step 4:The next page shows the many file kinds that users can securely store. Choose just about all the items users believe is worth rescuing.
- Step 5:Select the Backup option immediately.
- Step 6:After you’ve completed the recovery, then the user can reset the gadget to factory defaults. Then after, use dr.fone to restore every file of yours.
Backing up with Google accounts
1. Backup contact information
The contacts may be effortlessly uploaded to the Google account. What users need to do is get an internet connection at a reasonable pace.
- Step 1:Launch the phone’s Settings screen.
- Step 2:Browse for something like the Accounts and Sync list and click it after you’ve found it.
- Step 3:The Google account would be visible to users. If you haven’t done so already, one can do this by selecting the Add Account choice.
- Step 4:Afterwards, click on the recently added Google account.
- Step 5:Keep in mind that the option next to Contacts is checked.
- Step 6:Then, just at the bottom panel of the screen, select the Sync choice.
Read the directions below and then retrieve your contacts upon resetting your device.
To the list, get the Google account that you were previously using.
- Select the Google account that was recently created.
- Then, at the bottom of the display, tap the Sync item.
2. Using Google Drive to back up documents
Google Drive is unquestionably a great application. In addition, users may are using it to import a wide range of things, containing images, movies, files, and spreadsheets. One will, however, require a fast internet network to do so. Furthermore, users are limited to 15 Gb of onboard storage. That really is, however, for a particular account. So, if you really have many Google accounts, users really have enough storage capacity.
Take the following steps to share the documents:
- Step 1:On the screen, select the Google Drive symbol.
- Step 2:Whenever the application first launches, you’ll notice a bright Plus sign in the bottom right side.
- Step 3:Select it by clicking on it.
- Step 4:Just at the bottom of the display, just several features are available. Select the Upload button from the next drop-down menu.
- Step 5:Users might then select the files they would really like to upload.
- Step 6:When you are finished, select OK.
- Users could now hard reset note 10 after uploading the data. After you’ve done all the work, follow the given steps to get the data.
- Step 1:As described in the manner above, login the Google account to the device.
- Step 2:Next, launch the Google Drive application on the cell phone.
- Step 3:Choose all of the items you’d like to store on the device.
- Step 4:In the top-right corner, click the three vertical circles.
- Step 5:Select the button to download first from the pop-up box.
Also Read: Hey Google open assistant settings
3. Using Google Photos for backing up images and videos
It would be difficult to get stuff completed using Drive if you do not even cope with various kinds of documents frequently. Because you must choose all of the photographs and videos users would really like to submit. However, Google Photos is a suitable option.
- Step 1:By clicking just on the Google Photos application on the phone, users can access this.
- Step 2:Then, on the highest left side, simply click on 3 black lines.
- Step 3:Select the Settings tab.
- Step 4:Take a glance at the very first choice, Backup & Sync. Then switch that on and allow time for it to transfer all photographs and videos.
- Step 5: If users do not really need all of the items, simply they can pick and choose which items users need.
- Step 6:Conduct a restart on the cell phone at this stage.
- Step 7:So, exactly as it ever was, log in the Google account to that same catalog.
- Step 8:By selecting the application once more, you may access Google Photos.
- Step 9:Users will indeed be enabled to view all of the media that has been posted.
- Step 10:When it comes to the data in your app,
Whenever it relates to the application servers, several applications now include some sort of cloud storage option. As a result, users can select that choice for storing information on these kinds of applications.
Conclusion
I hope this article will help you to Hard reset your Samsung note 10. These methods are best as you can hard reset your Samsung Note 10 even without losing any kind of data. I have described various approaches which will make your process smooth and fast.